Set up NVIDIA passthrough to an LXC – The right way
This guide describes how to configure the passthrough of an NVIDIA graphics card to an unprivileged LXC on Proxmox, which enables the container to use the GPU for tasks such as video transcoding and AI.
While I was setting up the passthrough in my own homelab, I realized that all the available guides are either incomplete or use legacy methods and “hacky” solutions. That’s why the objective of this guide is to be complete and technically accurate. It follows the current NVIDIA guidelines, Proxmox recommendations, and Linux best practices to configure things in a secure, reliable, and efficient way.
The guide also addresses common problems such as:
- The NVIDIA device files are not initialized after a power-on or a reboot.
- The NVIDIA device files disappear.
You should follow the guide in order. The first half is the Proxmox host configuration and the second half is the LXC configuration. The final section covers the set-up of Jellyfin’s video transcoding.
All commands are executed with elevated privileges. You can either use root or the
sudocommand.
Prerequisites
Verifying the GPU detection
First, check that the motherboard recognizes your GPU. The following command should return a line with your NVIDIA GPU model:
1
lspci | grep VGA
Disabling Secure Boot
If your machine has Secure Boot enabled, Proxmox will refuse to load any driver that isn’t digitally signed by a “trusted authority”.
We are going to install the NVIDIA proprietary driver, which isn’t signed because it’s compiled during the installation. Therefore, if we don’t want Secure Boot to interfere with the setup, the easiest option is to disable it.
Alternatively, you can go through the process of signing the NVIDIA driver with a MOK (Machine Owner Key), but this process is a bit more complex and harder to maintain.
Check the Secure Boot status:
1
mokutil --sb-state
Then, check your motherboard’s manual, enter your BIOS/UEFI menu and disable Secure Boot. In my case, I had to press the <F2> key during the POST screen to enter the menu, and the option was under the Security tab.
Installing the NVIDIA driver in Proxmox
The NVIDIA driver version that is installed on the Proxmox host must be the exact same as the NVIDIA driver version that is installed on the LXC. It’s a requirement for the passthrough to work properly. That’s the reason why we will use the .run installer instead of the repository package.
Installing the dependencies
We are going to install the NVIDIA driver by using the official .run installer. This installer will compile the driver for our specific kernel version. In order to do that, first we need to install the required dependencies:
1
2
apt update
apt install -y build-essential proxmox-default-headers dkms
Blacklisting the Nouveau driver
The Nouveau driver is an open-source generic driver for NVIDIA cards that comes preinstalled with Proxmox. Before installing the proprietary NVIDIA driver, first we have to blacklist Nouveau, so the kernel doesn’t load it at boot. Otherwise, both drivers would try to control the GPU and that would cause issues.
The following command will create a file to blacklist the Nouveau driver. Then it will regenerate the boot image and reboot the system:
1
2
3
4
5
6
7
cat <<EOF | sudo tee /etc/modprobe.d/blacklist-nouveau.conf
blacklist nouveau
options nouveau modeset=0
EOF

update-initramfs -u -k all
reboot
Executing the .run installer
Find the latest recommended NVIDIA driver for your card on the official website and copy the download link. In my case, I have a NVIDIA Quadro T600, and the currently recommended version is v595.
The following set of commands will download the installer, mark it as executable, and execute it with the --dkms flag. The --dkms flag is really important, as it will prevent the driver from breaking if you ever update the kernel.
1
2
3
wget https://us.download.nvidia.com/XFree86/Linux-x86_64/595.58.03/NVIDIA-Linux-x86_64-595.58.03.run
chmod +x NVIDIA-Linux-x86_64-595.58.03.run
./NVIDIA-Linux-x86_64-595.58.03.run --dkms
Make sure to select the kernel module type <NVIDIA Proprietary>, and when prompted about DKMS, select <Yes>.
The rest of the default options should be fine; however, I recommend selecting <No> to the X configuration prompt and the 32-bit compatibility prompt since we are not going to need them. It’s safe to ignore the warnings in that regard.
Verify the driver installation by running the following commands:
1
2
dkms status
nvidia-smi
Setting the NVIDIA device files initialization
By default, the kernel only creates the primary NVIDIA device file (/dev/nvidiaX) at boot. The creation of the other NVIDIA device files, such as /dev/nvidia-uvm, is deferred until an application requests them. This technique is called “lazy-loading” and is designed to save resources.
In our case, this is a problem because the LXC bind-mounts these files from the host. If the files don’t exist before the container is started, it will fail. Therefore, we need to force the initialization of the device modules during Proxmox’s boot sequence.
The best approach is to use udev, which is the kernel device manager, along with the nvidia-modprobe command, which is the designated tool to load NVIDIA kernel modules and create the device files. We will create a new udev rule that calls nvidia-modprobe as soon as the primary NVIDIA module is loaded. This will force the creation of the remaining NVIDIA device files.
1
2
3
cat <<EOF | sudo tee /etc/udev/rules.d/70-nvidia.rules
ACTION=="add", SUBSYSTEM=="module", KERNEL=="nvidia", RUN+="/usr/bin/nvidia-modprobe -u -c 0 -m"
EOF
Reload the udev rules and apply the changes:
1
udevadm control --reload-rules && udevadm trigger
To verify the process, reboot the system and check that the NVIDIA device files have been created:
1
ls -l /dev/nvidia*
This approach is more reliable than using a Systemd daemon or a cronjob, because it triggers earlier in the boot sequence and it avoids the risk of starting the LXC before the device files are ready. The use of
nvidia-modprobeis also more efficient than other solutions that usenvidia-smi.nvidia-modprobeis the actual tool designed for this job; it’s faster and uses fewer resources.
If you have an enterprise GPU with MIG capabilities, you should modify the previous
udevrule. The following command includes additional-fflags to ensure thatnvidia-capXdevice files are also initialized:
cat <<EOF | sudo tee /etc/udev/rules.d/70-nvidia.rules ACTION=="add", SUBSYSTEM=="module", KERNEL=="nvidia", RUN+="/usr/bin/nvidia-modprobe -u -c 0 -m -f /proc/driver/nvidia/capabilities/mig/config -f /proc/driver/nvidia/capabilities/mig/monitor" EOF
Installing the NVIDIA Persistence Daemon
This section solves another common issue. By default, the NVIDIA modules are unloaded when they are not in use, as a way to save computer resources and lower power consumption.
Again, in our case, this is a problem because the NVIDIA device files disappear and the LXC may experience delays while accessing the GPU or completely lose access to it. Luckily, this time NVIDIA provides a Persistence Daemon that will maintain the GPU state and the device files open.
As stated in the official Persistence Daemon documentation, the NVIDIA driver comes with an installation script for the daemon, so you don’t need to do it manually. Most guides miss this part.
The daemon installation script is located at /usr/share/doc/NVIDIA_GLX-1.0/sample/nvidia-persistenced-init.tar.bz2. You just need to unpack the file and run the script.
1
2
3
cd /usr/share/doc/NVIDIA_GLX-1.0/samples
tar -xvf nvidia-persistenced-init.tar.bz2
./install.sh
The installer script will create a system user called “nvidia-persistenced” for the daemon to run as. After that, since Proxmox is based on Debian and uses Systemd, it will create a Systemd service file. It will register the service and enable it to start at boot.
Informational note. The Systemd service file is located at
/lib/systemd/system/nvidia-persistenced.serviceand its content is:
To verify the process, first check that the service is active and running:
1
systemctl status nvidia-persistenced
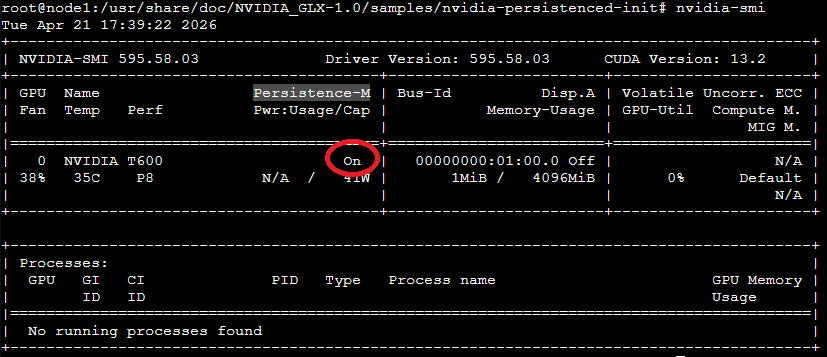
Then, run the monitoring tool nvidia-smi and check that the “Persistence-M” status is On:
1
nvidia-smi
Creating the Jellyfin LXC and passing-through the device files
Now it’s time to create the Jellyfin LXC and passthrough the device files. I strongly recommend using the “Proxmox VE Helper-Scripts” for this step, as it’s a lot easier and saves a lot of time.
Go to the Jellyfin Helper-Script page, copy the command under the “Install” tab, and paste it on your Proxmox shell. The command will download the setup script from Github and execute it.
1
bash -c "$(curl -fsSL https://raw.githubusercontent.com/community-scripts/ProxmoxVE/main/ct/jellyfin.sh)"
In the installation wizard, select the default install. The settings can be changed later, if needed. The installer will create the LXC using the default settings and configure it to use hardware acceleration.
If you followed all the previous steps, the installer will detect the NVIDIA GPU and the NVIDIA device files and configure the passthrough. When asked whether to install the NVIDIA driver libraries in the container, select <No>. We will install the libraries manually.
Output of the installation script with the default settings:
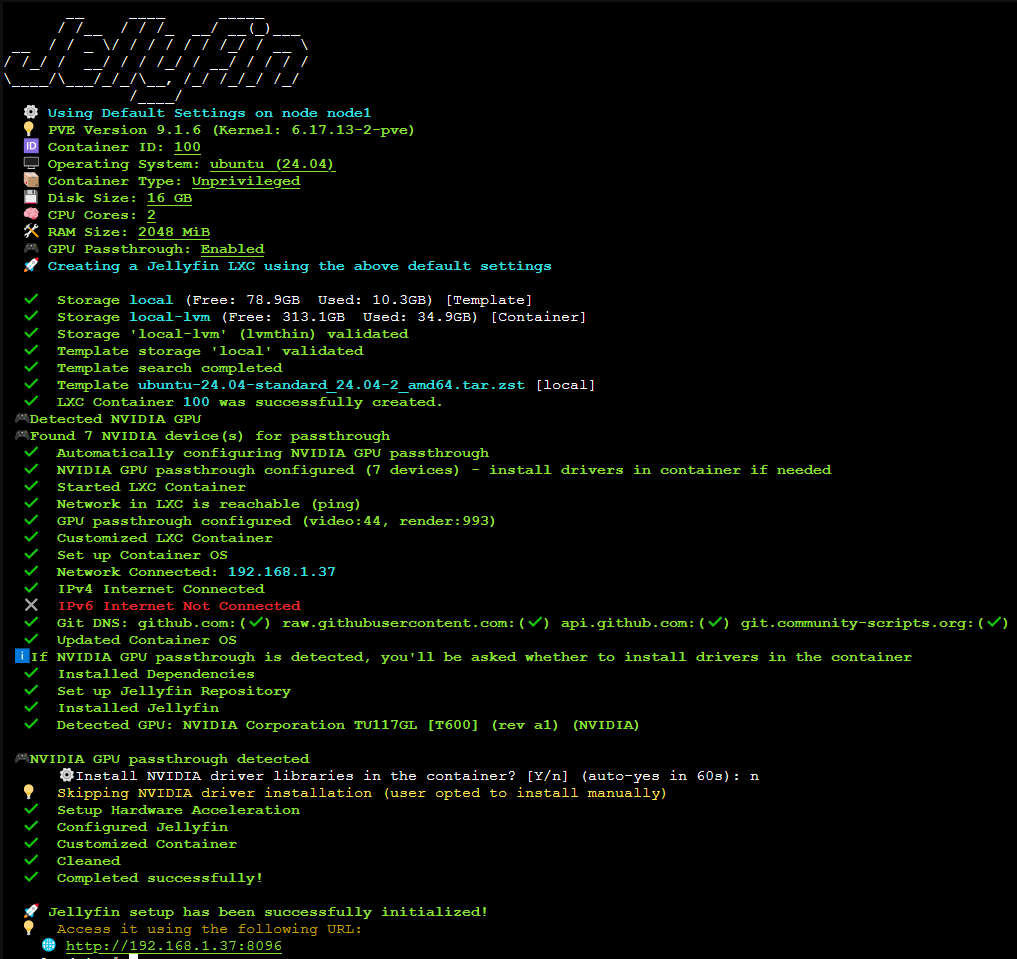
As a summary, the script will:
- Create the LXC with the selected settings.
- Update the container OS.
- Install the dependencies.
- Install Jellyfin.
- Set up the hardware acceleration.
To verify the process, list the NVIDIA device files:
1
ls -l /dev/nvidia*
Consider setting a static IP address for the LXC, so the IP address doesn’t change and it’s easier to access. You can do that in the Proxmox UI, in the Network tab of the LXC.
The script uses the “dev[n]” syntax to configure the hardware passthrough, which was introduced in Proxmox 7.0 and it’s the recommended way for modern versions. This syntax is cleaner and simplifies the permission management in comparison with the legacy method of using raw LXC directives.
You can check the hardware configuration of the container in the file
/etc/pve/lxc/CONTAINER_ID.conf, or by using the Proxmox Web UI, in the “Resources” tab of the container.
Your configuration file may look a bit different. The
nvidia-capXfiles may be missing in some consumer-grade GPUs, but don’t worry, these device files aren’t needed for transcoding.
Installing the NVIDIA driver in the LXC
The LXC shares the host’s kernel and is unable to load kernel modules on its own, so technically speaking, we are not installing the driver on the container; we are installing the specific libraries and utilities to interact with it. That’s the reason why we have to run the NVIDIA installer with the --no-kernel-modules flag. If you don’t add this flag, the installer will fail.
Copy the download link from the section Executing the .run installer and execute the following commands. Replace the URL with your own.
1
2
3
wget https://us.download.nvidia.com/XFree86/Linux-x86_64/595.58.03/NVIDIA-Linux-x86_64-595.58.03.run
chmod +x NVIDIA-Linux-x86_64-595.58.03.run
./NVIDIA-Linux-x86_64-595.58.03.run --no-kernel-modules
Select the kernel module type <NVIDIA Proprietary>.
The rest of the default options should be fine; however, I recommend selecting <No> to the X configuration prompt and the 32-bit compatibility prompt, since we are not going to need them. It’s safe to ignore the warnings in that regard.
To verify the process, run the monitoring tool nvidia-smi:
1
nvidia-smi
Setting up and verifying video transcoding on Jellyfin
Download the testing video
To verify that the video transcoding with hardware acceleration is working as expected, we are going to use the open-source film “Big Buck Bunny”, from the Blender Institute. This film is available in multiple formats and is typically used for these kinds of tests.
Run the following command in the LXC console. The commands will create a folder that will be used as a Jellyfin media library and download the film in 4K resolution and 60FPS.
1
2
3
4
5
6
mkdir -p /home/jellyfin/Movies
chown -R jellyfin:jellyfin /home/jellyfin/
cd /home/jellyfin/Movies/
wget https://download.blender.org/demo/movies/BBB/bbb_sunflower_2160p_60fps_normal.mp4.zip
unzip bbb_sunflower_2160p_60fps_normal.mp4.zip
rm bbb_sunflower_2160p_60fps_normal.mp4.zip
Jellyfin initial setup
The Jellyfin initial configuration is done through the web UI. To access it, visit the IP address of the LXC with your browser, on port 8096. The URL should be http://LXC_IP:8096.
Follow the setup wizard:
- Select language
- Setup administrator account
- Add media libraries
- Set a preferred metadata language
- Networking settings
You can follow the official walkthrough for this part.
Make sure to add a media library that points to the directory with the testing video, /home/jellyfin/Movies. You can do it during the initial setup, or you can skip that part and add the media library afterward.
Hardware acceleration configuration
Go to the Jellyfin’s administration dashboard. You can find it in the left menu. Then, under the “Server” section, go to “Playback” → “Transcoding”.
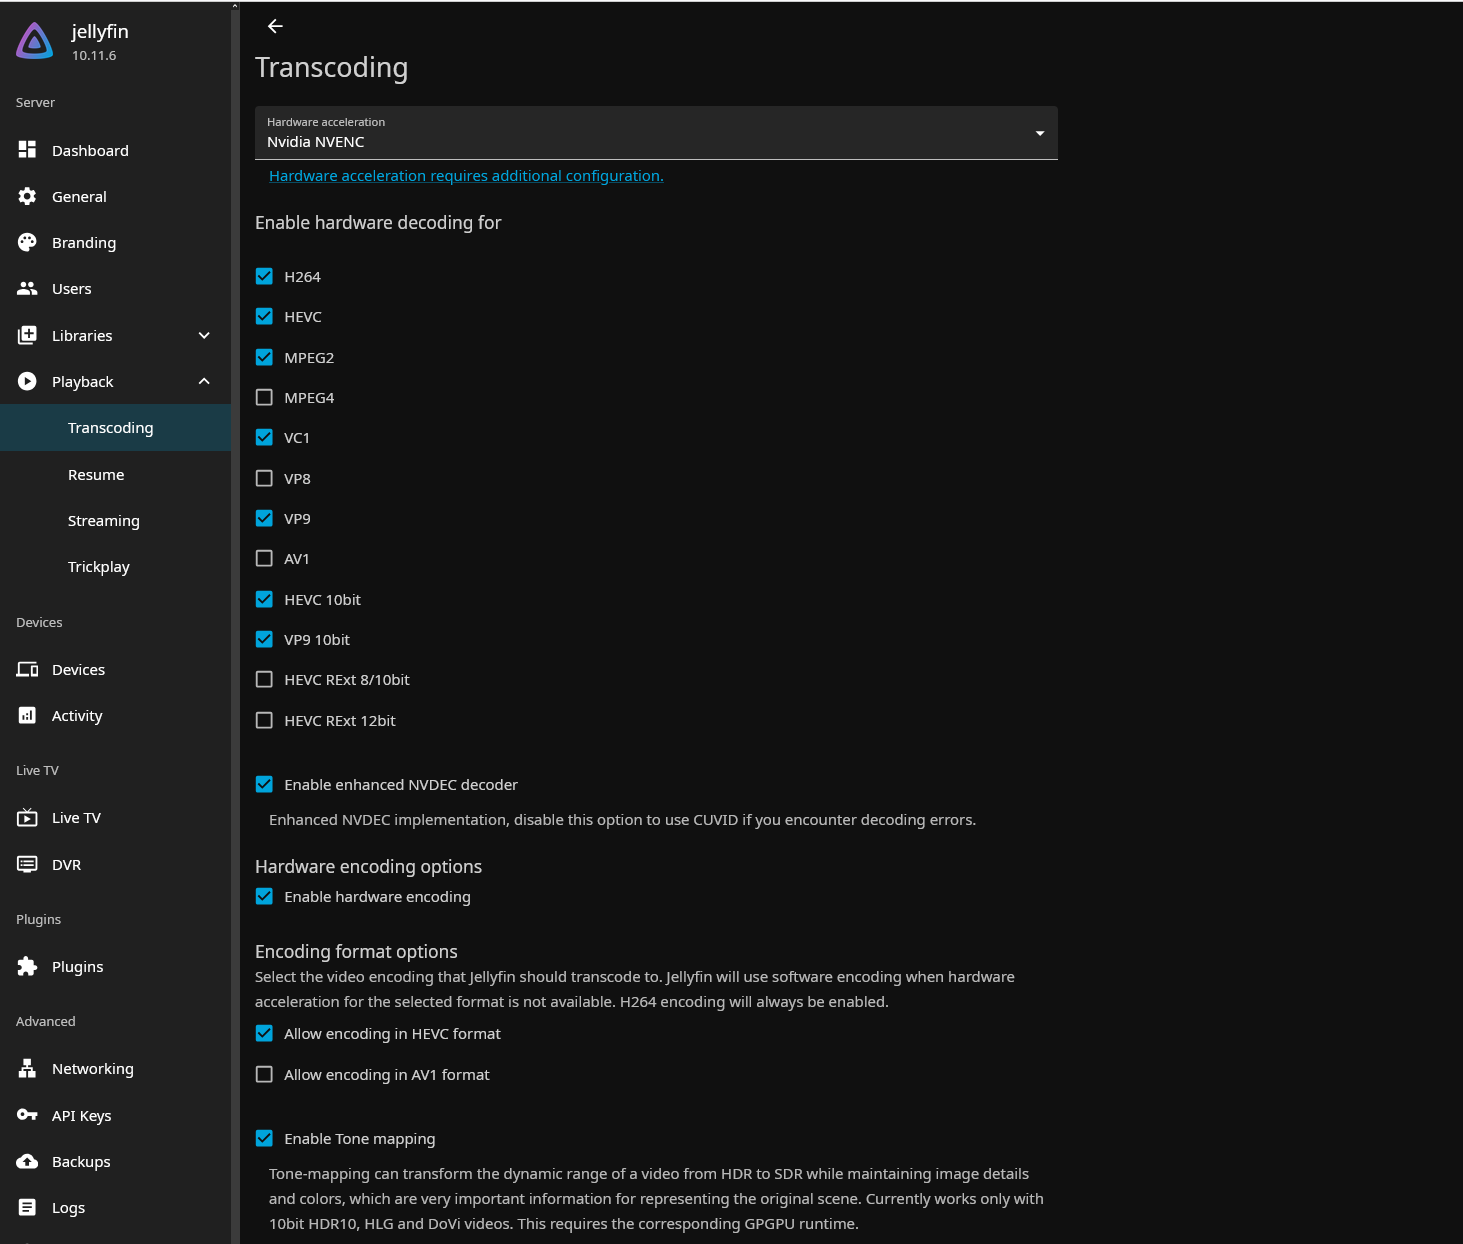
In the hardware acceleration dropdown, select “Nvidia NVENC”.
Now you have to determine which video codecs your GPU is able to encode and decode. The easiest way is to use the NVIDIA Encode and Decode Support Matrix. You can also rely on Jellyfin’s documentation and your AI of choice to help you with this task.
Mark the supported codecs of your GPU. Then check the “Enable Tone mapping” option to enable the transformation of HDR video to SDR video, and save the changes.
I have an NVIDIA Quadro T600, so in my case, the transcoding configuration looks like this:
Verifying the video transcoding
Go to the Jellyfin’s user interface by clicking on the logo in the top-left corner. Select the “Big Buck Bunny” video and hit the play button.
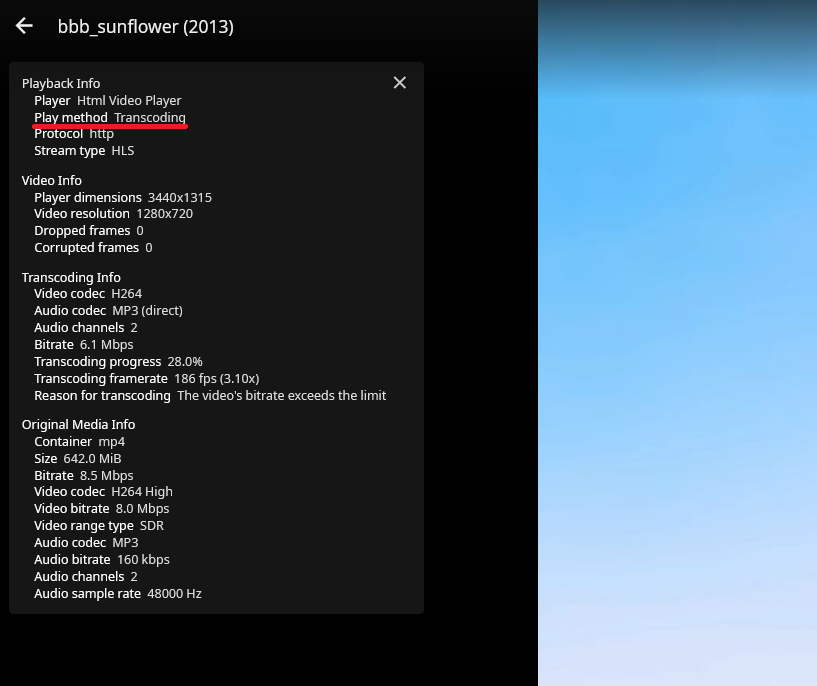
Once the video starts playing, open the playback settings by clicking on the gear icon and selecting “Playback Info”. You should see an overlay with the playback information.
We want the “Play method” value to change from “Direct playing” to “Transcoding”. We will force that by changing the video quality in the playback settings. Wait a few seconds for the change to take effect.
We can double-check that the hardware acceleration transcoding is working by running the following command in the Proxmox console. We should see, in real time, how the GPU usage increases while it’s transcoding.
1
watch -n 1 nvidia-smi
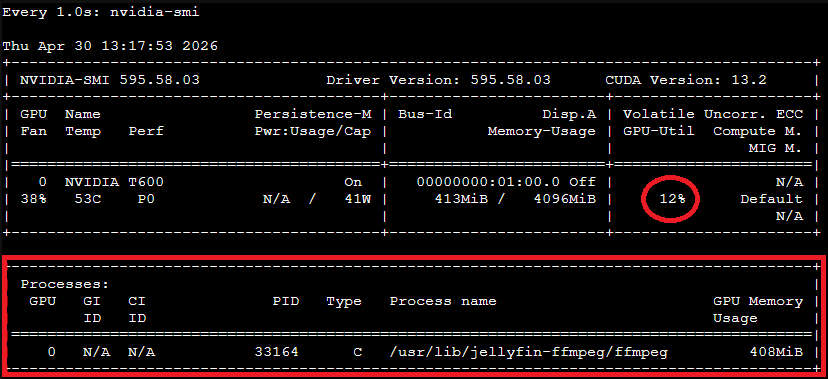
Congratulations! You have properly configured the NVIDIA passthrough in Proxmox and the hardware acceleration transcoding in Jellyfin. Depending on your GPU capabilities, this setup will be able to handle multiple 4K concurrent streams 🎉